Martin’s Monster: My Totally Impractical Raspberry Pi Soundboard
Back in 2019, when I was a young IT lad working at a hospital, my favorite coworker (and one of my best friends to this day) would constantly quote audio based memes, video game noises, and more graining sounds. One day I decided to use one of my spare Raspberry Pi devices and engineer up a soundboard. Its still one of my proudest accomplishments even though its very unpolished and messy. (Its a great big pile of a thing!). Here’s a break down of the build and program:

Circuits and Wires, Oh My!
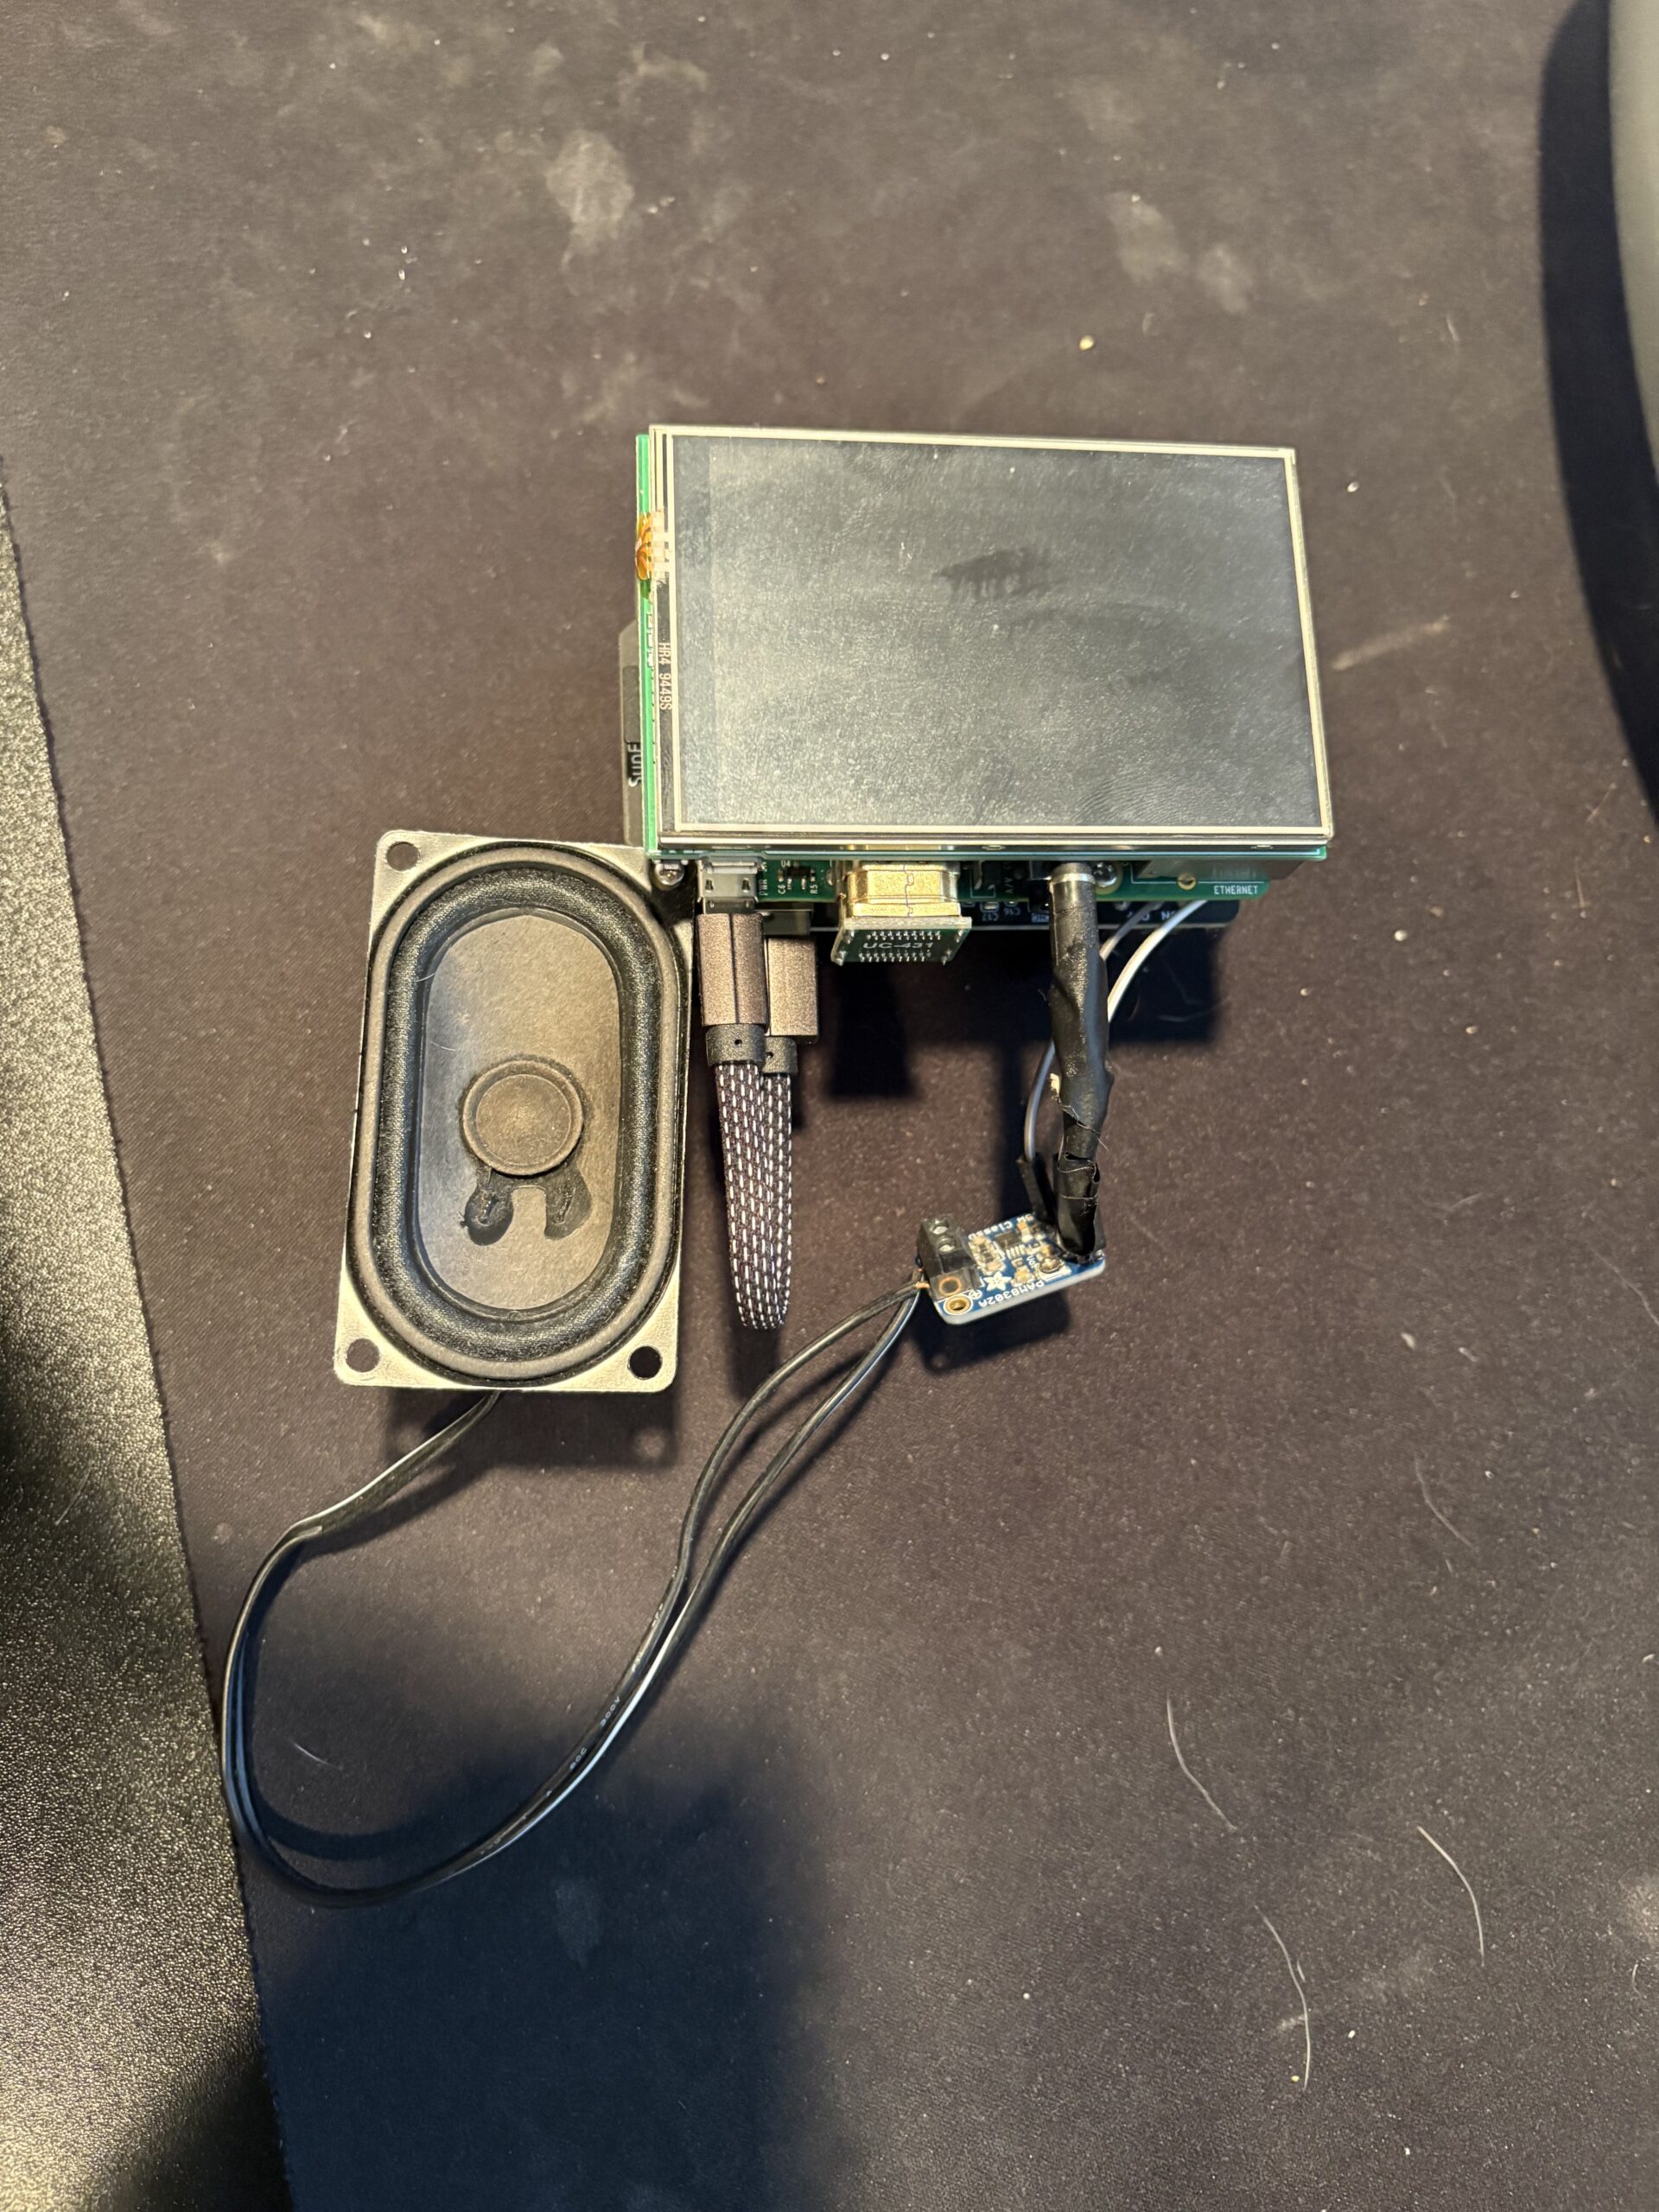
Observe this image in its oh-so messy glory. Its a beaut’, Clark.
This bad boy is running on a Raspberry Pi 3B, with a Uctronics LCD touch screen, an Adafruit 5 watt amp, an old speaker I tore out of a Jameco build-your-own radio kit, and a Pi Power module from Sunfounder. I also salvaged an old 3.5mm cable from a spare set of headphones. Links to the equipment below:
Raspberry Pi – Raspberry Pi 3B
Jameco – AutoScan FM Radio Soldering Kit
The LCD screen fits snuggly over the GPIO pins on the Pi’s board to supply power to the board and touch input, however, you need the HDMI-to-HDMI adapter that comes with it to supply display signals to the monitor.
The Pi Power takes two 18650 batteries, and connects with a 3 inch USB-A/USB-Micro cable. This baby can stay powered through a whole 8 hour shift!
Now’s here’s where my ingenuity shines! I spliced out the headphone wire, soldered it to the audio in ports, then ran the speaker wires into the 5W amp. It still needs power, so run two connectors from the Pi’s GPIO pins and solder them into tthe 2-5VDC and Ground ports. (White = 3V line | Grey = Ground line) The 3.5mm connector needs to plug into the LCD screen’s onboard 3.5mm jack.
Now assemble this tower of scrap!

Software Setup – Copy Pasta
I ran a plain image of Raspbian OS for this. I wanted to GUI version in order to troubleshoot, and because of that, we needed to run our python program at startup; more on that later.
Here’s the exact steps I took once I booted up tinto the OS:
1 – Turn on SSH via GUI or terminal (makes it so much easier, and the Pi should never connect to wireless anyway)
2 – Expand the filesystem
raspi-config --expand-rootfs3 – Install the audio player – https://pypi.org/project/audioplayer/
sudo apt-get install python-gst-1.0 \
                     gir1.2-gstreamer-1.0 \
                     gstreamer1.0-tools \
                     gir1.2-gst-plugins-base-1.0
                     gstreamer1.0-plugins-good \
                     gstreamer1.0-plugins-ugly
4 – Install Pillow
sudo pip3 install Pillow5 – Install Tkinter
sudo apt-get install python3-pil python3-pil.imagetk6 – Install LCD Screen drivers – There’s also a handy guide on the manufacturer’s site.
sudo git clone https://github.com/UCTRONICS/UCTRONICS_LCD35_RPI.git
Step4 Go to the UCTRONICS_LCD35_RPI
cd UCTRONICS_LCD35_RPI
Step5 Change the file permission
sudo chmod 777 UCTRONICS_LCD_backup
sudo chmod 777 UCTRONICS_LCD35_install
sudo chmod 777 UCTRONICS_LCD_restore
sudo chmod 777 UCTRONICS_LCD_hdmi
Step6 Backup original system data
sudo ./UCTRONICS_LCD_backup
Step7 Install the LCD35 driver
sudo ./UCTRONICS_LCD35_install
Wait for a while the system will be installed and restarted automatically.
If you want to reuse the original system, you can use the below command
sudo ./UCTRONICS_LCD_restore
If you want to display on HDMI instead of LCD, just use the below command
sudo ./UCTRONICS_LCD_hdmi
Now your Pi should be prepped for your program.
Prep Your Bytes
I essentially just used Audacity to clip audio bites from YouTube videos, and screenshotted the images I wanted from Google Images. I think set up a local project folder to begin working. This is pretty self explanatory and good practice.
The Knights Who Say Ni! (Python Time)
I used to dabble with Python. I don’t so much anymore. Don’t ask a wizard how he performs his magic; just admire the spectacle. You can check out the full program on my GitHub!
First you must import your modules: Tkinter (for a GUI), PIL or Pillow (for image processing), and audioplayer (obviously, for audio processing). These modules are crucial for getting this app to work.
import tkinter as Tk
from PIL import Image, ImageTk
from audioplayer import AudioPlayer
I won’t go into too much detail for this section as I’m not as familiar with it as I used to be. You’ll want to use the basic functions of Tkinter for your GUI. Here’s what I did for the initial setup
root=Tk.Tk()
root.title('Soundboard')
root.attributes("-fullscreen", True)
Then, using Pillow, I resized each poorly screen captured image into a consistent size. I found that 24 square buttons at 150px x 150px worked for my use case. The resizing should look like this:
image_size = (150,150)

Btn1_img = Image.open("Images/chiefdead.jpg")
Btn1_resize = Btn1_img.resize((image_size),Image.ANTIALIAS)
Btn1_image = ImageTk.PhotoImage(Btn1_resize)
Repeat for each button. (See I told you my programming was gross!)
Now we’ll put all of our buttons into a nice and neat grid as follows:
class Application(Tk.Frame):
    def __init__(self):
        super(Application, self).__init__()

        self.grid()
        self.button1()
        self.button2()
        self.button3()
        self.button4()
        self.button5()
        self.button6()
        self.button7()
        self.button8()
        self.button9()
        self.button10()
        self.button11()
        self.button12()
        self.button13()
        self.button14()
        self.button15()
        self.button16()
        self.button17()
        self.button18()
        self.button19()
        self.button20()
        self.button21()
        self.button22()
        self.button23()
        self.button24()
        self.pack()
Each button needs to be defined. You need to make it a button, reference its location, give it a command, and grid location. Follow the below example and modify your own buttons:
#Button 1
    def button1(self):
        Button1 = Tk.Button(self)
        Button1["text"] = "Chief"
        Button1["command"] = self.PlayClip1
        Button1["image"] = Btn1_image
        Button1.grid(row=1,column=1)

    def PlayClip1(self):
        AudioPlayer('AudioClips/chiefdeathinstant3.wav').play(block=True)
Then wrap tit all up by closing Tkinter:
app=Application()

Tk.mainloop()
Final Touches
Now, because I’m a doofus, and I wrote and tested the app on Windows, I needed to switch all of my “/” to “\” simply because its going to be running on Linux. Now copy your entire program’s project folder over to the Raspberry Pi and follow this forum post on how to run this program at startup.
Each one of these buttons were interactable and would play an associated annoying sound bite. Man, I really used my powers for something good this time.

The Closer
This was a fun build back in the day. I long for the days of having the time to dabble with Python and Raspberry Pi. Maybe one day I’ll make a version 2.0, but until then:
This project is provided “as is” without any warranty of any kind, express or implied. Use it at your own risk. The authors and contributors are not responsible for any damage, data loss, or other issues that may arise from using this software. You are solely responsible for any actions taken based on this code.